Estimating And Installing Wall-To-Wall Carpet
This is an excerpt from the Book called “Improvement and Renovation“ by Bob Vila. Continue reading to learn more about Estimating And Installing Wall-To-Wall Carpet, thanks to the author.
Two principal types of carpet are glue down (also called cushion back) and stretch-in-carpets. A glue-down carpet typically has a cushion layer of foam rubber, jute or action backing and is secured directly to the sub-floor with latex adhesive. An increasingly popular version of glue-down carpet is called double-stick carpet-which involves gluing the cushion to the floor, then the carpet to the cushion. Some carpets, called unitary back, have no backing at all and require higher-grade adhesive that must be allowed to “breathe” in order to set.
A stretch-in carpet has a separate undercushion stapled to the subfloor onto which it is placed. It is stretched and hooked onto tackless strips nailed to the edges of the subfloor or stairs-a procedure that is often best left to professionals.
While both types of carpets are still equally common, the glue-down carpet is often favored over the stretch-in carpet by the do-it-yourselfer because few special tools are required to repair or replace it. In addition, glue-down carpet is usually less expensive than carpet installed over separate padding.
You can tell pile direction by stroking it: Stroking against the pile direction will raise the nap. When you “look into” the pile, with the fibers leaning toward you, a carpet takes on its deepest hue. When you “look over” the pile, the carpet appears flatter and lighter in color. If possible, carpet should be installed with the pile leaning toward the main entrance to the room, presenting its fullest, richest appearance. To help hide the seam where two pieces of carpet are joined, the pile of at least one side should lean over the seam. In a doorway connecting two rooms, the pile from both sides may lean over the seam, but within a room the pile of every section of carpet must lean the same way or the pieces will show up as different hues.
Pile direction is one of several factors that must be taken into account when you are planning the layout of a carpet in a room and calculating how much to buy. Some others to remember are:
- Unless you have some carpet installation experience, you may be wise to begin in a small room requiring carpet with no seams.
- Run the longest seam in the room toward the major light source-usually the largest window. A seam running parallel to light rays is much less apparent than one running across them.
- Keep seams away from high traffic areas, such as between doors of a room. The foot traffic thus directed along the seam length may loosen it.
- A tool called a carpet tractor is useful when making seams. Available from some carpet equipment suppliers, it pulls the two edges together for a tight seam.
- The best way to determine how much carpet you will need is to make a scale drawing of the area to be carpeted on graph paper. Choose a scale that will keep the drawing a convenient size; equating each square of the graph paper to a square foot usually works well.
- Make separate measurements of the entire length of each wall and then the shorter distances between its various features, such as doorjambs. Double-check for error by making sure the sum of the parts is equal to the whole. Compare diagonal measurements and the distances between walls to see if the walls are skewed or bowed. Plot the walls, doors and windows on the graph paper.
- Include the areas where the carpet will extend into doorways or bays as part of the room’s overall dimensions; then add 3 inches to the length and the width of the floor for error. You may also have to add 1/2 inch for trimming each factory-cut edge; ask the carpet dealer for the manufacturer’s recommendations.
Now, bearing in mind the rules about pile direction and the location of seams, figure out how many running yards of carpet 12 feet wide you need to cover the room, keeping the seams and the amount of wasted carpet to a minimum. To do this, experiment with graph paper cut to represent a length of carpet 12 feet wide.
If the carpet is patterned, you must take into account the repeat-the distance from the point where a pattern begins to where it begins again-in order to be sure of matching the pattern along a seam. If your scheme involves matching the pattern only lengthwise across two original edges of the carpet, simply allow for a full extra repeat on one of the lengths, and you will be able to adjust it to match. Take your scale drawing to your carpet dealer to have your estimates checked. If the carpet will meet an adjoining surface other than carpet, buy the length of binder bar needed; install it.
Before starting, nail uneven boards, remove grills from heating vents and sweep the floor. You may wish to remove shoe moldings, then put them back or repaint the baseboards before laying the carpet. The floor must be dry. A remedy for occasional moisture in a concrete floor is layer of concrete sealer. However, if water rising from the ground leaves the floor permanently damp, it is best to forgo carpeting entirely, as the moisture will rot the cushion-back. Test for water seepage with a sheet of plastic taped to the floor.
The Making Of A Tufted Carpet. The pile yarn of tufted carpet is stitched through a layer of open- weave fabric-the primary backing. A second fabric backing is stuck onto the underside of the first with a coating of latex. When the yarn is left uncut the result is loop-pile tufted carpet (left). But the tops of the loops are often split or cut off, making cut-pile tufted carpet (right).
Rough-Cutting And Seaming
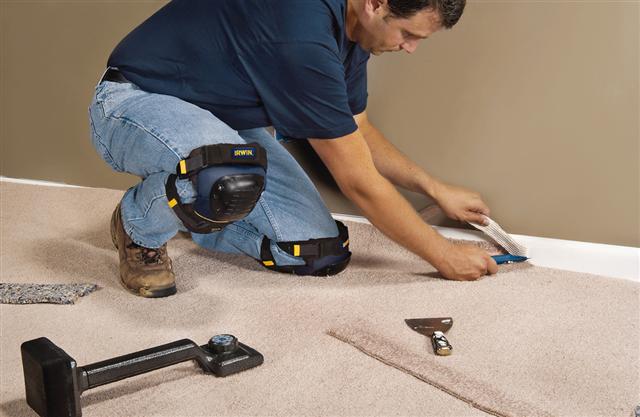
Once you have carefully planned the carpeting of a room, unroll your carpet. Before cutting it, check for any defects and make sure that it is the size you ordered. Unroll the carpet in an empty room, basement, driveway or yard-over newspaper if necessary-and give it time to flatten.
Cut-pile carpet should be cut from the back (right). Loop-pile should be cut from the front (below) to be sure the cut carpet does not remain joined by loops across the cut. When you lay out the pieces in the area to be carpeted, place them so that the pile leans in the same direction. Position the carpet by kicking it or by flapping smaller pieces as if shaking a tablecloth, until the excess extends up all walls equally. Make relief cuts at corners (right, inset), using a utility knife. Seams across the width of the carpet require special cutting with a row-running cutter.
Two Ways To Cut A Carpet
Cutting A Cut-Pile Carpet. Measure along the face of the unrolled carpet, cut notches in the edges, fold the carpet back and snap a chalk line across it with a string held between the notches. Cut along the chalk line with a row-running “cushion back” cutter guided by a good straightedge. Extend the blade of the knife only enough to cut the backing.
Cutting Loop-Pile Carpet. Measure the carpet and cut it from the face between rows of loops with a row-running “cushion-back” cutter or with a utility knife. If the rows are not straight use a straightedge. If you use the row runner (inset), retract both blades and separate the pile by sliding the runner along the backing. After making a path, extend the blade on the side of the tool next to the section of carpet you will use and make the cut.
Glue-Down: Easy To Install
Glue-down carpet is the easiest type to install. It requires no stretching, no specialized tools and no tackless strips. It is simply cemented down-or, in some cases, stuck to the floor with double-faced tape. Also, glue-down carpet is usually less expensive than carpet installed over separate padding.
Although it goes down easily, once cemented glue-down is impossible to remove intact-the cushion-backing rips off the face of the carpet as it is pulled up. The carpet cannot be used again and the backing and adhesive must be scrapped off the floor; unless recarpeted, the floor will have to be refinished. And the foam backing of some cheap glue-down carpets may decompose in a few years; heavier backing generally lasts longer. Although weight is not the only determinant of carpet life, 26 ounces per square yard is the recommended minimum for a typical room, and 28 ounces for public areas such as stairs or hallways.
For cementing most glue-down carpets, use a multipurpose latex adhesive, available at hardware stores. Caution: When shopping for glue-down carpet, be sure to ask about backing material. Special adhesive is required for carpets with vinyl backing or those used below ground level. Often the backing material is difficult to identify-even for the carpet dealer. If unsure of the material, contact the manufacturer.
Before laying the carpet, it should be preconditioned to room temperature- at least 65°–for 72 hours. Remove all dust, wax and paint from the floor, patch cracks and secure loose tiles or floorboards. The floor must be dry; a permanently damp floor is best left uncarpeted. While installing the carpet, and for 72 hours thereafter, make sure the room is well ventilated.
Many floors are so large that carpet cannot be laid without a seam. In such cases, begin to cement under the seam area (step 1). If the room needs only one piece, lay the carpet out, fold it in half with the triangular folds described in step 4 and proceed with installation according to that and subsequent steps.
- Preparing To Make A Seam. Before applying adhesive (below), rough-cut and lay out the carpet. Snap a chalk line on the floor where the seam will run. Align the edge of one piece of carpet with the line and pull the other piece so that its edge overlaps the first by1/4 inch. Fold both pieces back about 3 feet. With a 3/32-inch V-or U-notched trowel, spread a thin, even layer of adhesive on the exposed floor. Roll one piece of carpet onto the adhesive, lining it up with the chalk mark.
Then pull the carpet back to inspect the backing. If the floor pattern has been imprinted on the backing, the carpet should adhere well. Working from there toward the wall, use your hands to rub out any air bubbles that may be trapped beneath the carpet.
- Gluing The Seam. Apply a bead of seam sealer (above) to the primary backing-just between the pile and the cushion-at the edge of the cemented-down piece of carpet. Work carefully; seam sealer may ooze to the top, and will attract dirt. If any adhesive gets on the pile of the carpet, wipe it off immediately with a clean white rag moistened with seam solvent, available from a carpet dealer. (Caution: Seam solvent is corrosive, and attacks rubber backing; do not leave it on the face pile, and wash your hands immediately.) To make the job easy and accurate, notch the nozzle of the applicator at the height of the primary backing, and then run the tip along the floor while the adhesive feeds onto the carpet edge.
- Making A Compression Seam. Unfold the second piece of carpet and position it on the floor. Butt the edge of this piece of carpet against that of the glued-down piece and work any bulges resulting from the overlap away from the seam with your fingers until you reach the unglued area. When gaps occur at the seam, seal them by pulling and pressing the carpet edges together with your fingers until the two pieces meet all along the seam.
- Completing The Cementing. Fold one piece of carpet back from the wall until you reach the part that has already been cemented to the floor. To prevent the carpet from grabbing along the wall as you fold it back, first fold each corner of the carpet at a 45° angle toward the center of the seam. Trowel the adhesive onto the exposed floor and unfold the carpet in reverse order, rubbing any wrinkles or ridges out toward the wall with your hands or with the paper core of a carpet roll. Repeat this process on the other side of the room. When the carpet is cemented down, crease it along the walls with a screwdriver.
Trim off excess at a distance above the floor equal to the thickness of the carpet. Then tuck the edge of the carpet against the wall with the screwdriver. Tamp down the flanges of the door-way edgings.
- Flattening A Bubble. Where the carpet is not adhering to the floor, poke an awl through the carpet and use a plastic syringe-available from a carpet-supply dealer-to inject a special quick-drying cement called contact adhesive into the hole. Then press down on the carpet with your hands until it holds firmly to the floor.
Easiest Yet-Taped Cushion-Back
Short of just letting the carpet lie loose on the floor, no installation could be easier than sticking down cushion-back carpeting with double-faced tape. Unfortunately, the carpet is likely to develop wrinkles between the strips of tape, and is likely to come unstuck altogether if it gets much wear. In addition, the floor surface will be ruined by the tape. It does, however, provide a simple, quick and cheap way to carpet an area where permanence is unimportant and where the floor will always be covered.
In a lightly traveled room, you need to apply tape only around the perimeter, flush with the walls, with a double strip of tape in front of any doorways. In a busier room, lay tape not only around the perimeter, but also diagonally 1 foot apart across the floor.
Stick down the tape, folding under a corner of each strip to provide a tab for removing the paper covering the face of the tape. Position the rough-cut carpet on the floor and fold back one side in the triangular manner described in step 4 above. Peel the protective cover from the strips of tape and roll the carpet onto the taped area. Then press the carpet onto the tape with your fingers. Finish the job by trimming the carpet along the walls.